Did you know that you can navigate the posts by swiping left and right?
How to build your own private ethereum blockchain
25 Dec 2017
. category:
tech
.
Comments
#blockchain
#ethereum
During the last months ethereum has became the first platform of choice for new token deployment where tokens follow the ERC20 standards and are defined using smart contracts, and this trend does not seem to be going away any time soon, so in this write up i wanted to build a private ethereum blockchain that I will use later for smart contract deployment
Topology
for this first part, we will have only one node doing all the mining and the block generation, we will have a second terminal connect to the geth node as a console to issue commands, and we will run MIST for visualization and contract deployment
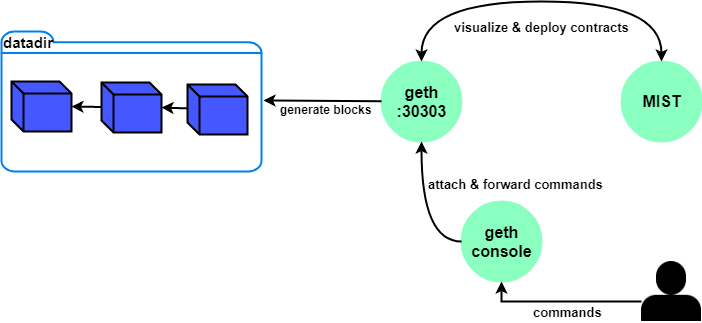
Figure 1 : process topology
Setting up
for this first article we will basically need two tools GETH and MIST.
what is GETH?
the ethereum foundation defines geth as a command line interface (CLI) implemented in the go programming language which enables you to interact with the public ethereum blockchain (mine ether, create accounts, make transactions, run smart contracts …etc.). on top of that if enables us to create our own private blockchain and do all of that privately for testing purposes which is what this article is about, you can find install instructions here
what is MIST?
Mist is a tool to browse and use decentralized apps (DAPPs) it provides a user friendly interface to interact with the blockchain and DAPPs, you can download the appropriate MIST install package for your operating system here
Step 1 : Creating the genesis block
in a blockchain the genesis block is the first block, and it contains the rules that will govern the creation of next blocks, in our case we will use a config file written in JSON to describe genesis block rules, the following are the genesis options we will be using they might be slightly different depending on your case.
you can find the meaning of each option and other additional options here
    {
    "config": {
        "chainId": 15,
        "homesteadBlock": 0,
        "eip155Block": 0,
        "eip158Block": 0
    },
    "difficulty": "300",
    "gasLimit": "2100000",
    "alloc": {},
    "parentHash": "0x0000000000000000000000000000000000000000000000000000000000000000",
    "nonce": "0x0000000000000042",
    }
besides the genesis config file, we need to give geth another information called datadir which is the location where we want to put our blockchain data. it is very important that the genesis file is not inside the datadir start geth with the following command (don’t forget replace the paths)
mheni@host01:~$ geth --datadir "path/to/data/directory" init "path/to/genesis.json"
you should get an output similar to this, the most important is that it says “Successfully wrote genesis state”
    INFO [12-22|20:33:50] Allocated cache and file handles         database=/home/.../chaindata/geth/chaindata cache=16 handles=16
    INFO [12-22|20:33:50] Writing custom genesis block
    INFO [12-22|20:33:50] Successfully wrote genesis state         database=chaindata                               hash=01c842…27160f
    INFO [12-22|20:33:50] Allocated cache and file handles         database=/home/.../chaindata/geth/lightchaindata cache=16 handles=16
    INFO [12-22|20:33:50] Writing custom genesis block
    INFO [12-22|20:33:50] Successfully wrote genesis state         database=lightchaindata                          hash=01c842…27160f
the result from this operation is the creation of a new file-based database located at the specified datadir
    .../datadir
        geth/
        chaindata/      "will contain the blockchain each block in a seperate file"
        lightchaindata/ "will contain a light version of the blockchain "
         keystore/         "will contain keys for the accounts we will create later"
Step 2 : Start the geth process
now that we have initialized our blockchain we can launch the geth node which will mine new blocks and make future transactions, to do that we use the same command without the init option.
mheni@host01:~$ geth --datadir "path/to/data/directory"
the output should look like the following, what’s important here is the creation of an IPC file ( Inter Process Communication) a file that we will use later to synchronize multiple nodes in order for them to work together and generate a consistent blockchain
    INFO [12-22|22:31:57] Starting peer-to-peer node               instance=Geth/v1.7.3-stable-4bb3c89d/linux-amd64/go1.9
    INFO [12-22|22:31:57] Allocated cache and file handles         database=/home/.../chaindata/geth/chaindata cache=128 handles=1024
    ...
    INFO [12-22|22:32:00] IPC endpoint opened: /home/.../chaindata/geth.ipc
Step 3 : Attach a geth console to interact with geth node
now that we have started the geth node it is waiting for commands to execute, we will attach a geth console to that node in order to interact with it, we do so using the IPC file generated in the previous step
mheni@host01:~$ geth attach ipc:"/path/to/geth.ipc"
you will get a console prompt waiting for your commands.
for this first article we will create two accounts and start mining some Ether with the first account then send some Ether to the second account, so the first thing is to use the following command to create accounts.
    > personal.newAccount()
        Passphrase:
        Repeat passphrase:
        "0xf5d7f9c26294ee9a0b2c615f600c078f87fb1932"
it will ask you for a password that is needed when making transactions, as a result it will generate a new address for the new account which is described with a JSON file in the keystore directory, see how the addresses match
mheni@host01:~/.../chaindata/keystore$ ls
UTC--2017-12-24T04-42-52.882191162Z--"f5d7f9c26294ee9a0b2c615f600c078f87fb1932"
do this twice to create two accounts.
now that we have accounts we can start mining and the resulting ether will be sent to the first account’s address as it is considered as the main account
> miner.start(1) "start mining with one thread"
on the other side the geth node starts mining and creating new blocks
    INFO [12-24|00:18:35] Updated mining threads                   threads=1
    INFO [12-24|00:18:35] Transaction pool price threshold updated price=18000000000
    INFO [12-24|00:18:35] Starting mining operation
    INFO [12-24|00:18:35] Commit new mining work                   number=68 txs=0 uncles=0 elapsed=298.781µs
    INFO [12-24|00:18:38] Successfully sealed new block            number=68 hash=e3820b…ce5624
    INFO [12-24|00:18:38] 🔗 block reached canonical chain          number=63 hash=e65791…cecc05
    INFO [12-24|00:18:38] 🔨 mined potential block                  number=68 hash=e3820b…ce5624
    INFO [12-24|00:18:38] Commit new mining work                   number=69 txs=0 uncles=0 elapsed=188.676µs
    INFO [12-24|00:18:40] Successfully sealed new block            number=69 hash=5efb99…63b086
you can use the console to stop mining at any time, but you will notice if you make transactions they will not be validated until you start mining again “at least one node mining”
> miner.stop() "stop mining"
Step 4 : start Mist and make transactions
in a new terminal we will start mist and make it attach to the private network by specifying the IPC file, without that IPC file MIST will try to attach to the public ethereum blockchain.
mheni@host01:~$ mist --rpc "/path/to/geth.ipc"
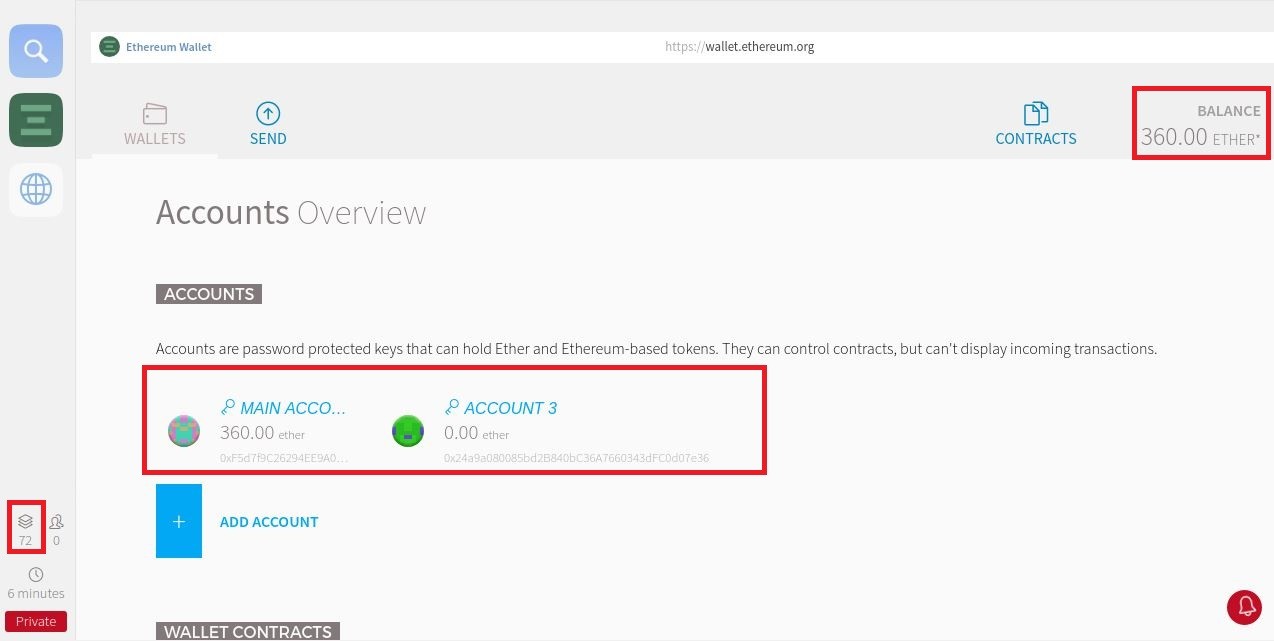
the MIST browser shows lots of information, you can see that i have mined 72 blocks so far which resulted in 360 Ether sent to the main account, the other account is empty and we will send him some Ether next.
making transactions is very straight forward, we go to the send tab and we find a regular web form to fill once filled “copy and paste the recipient address” hit the send button, you will be asked to type the password of the sender’s account, do that and wait for a few seconds “depending on the difficulty in the genesis file” to see the Ether go from one account to the other.

note : make sure the geth node is mining blocks, if not start the mining process
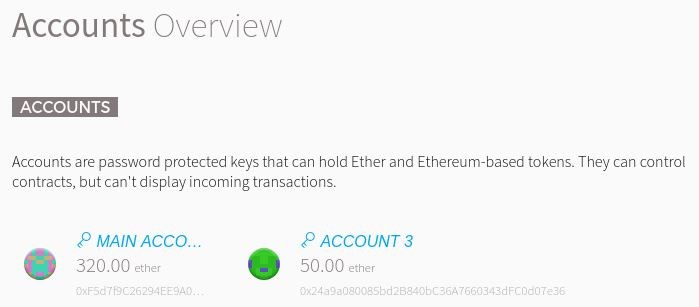
to check if the transaction was confirmed we use MIST account overview, the second account now has 50 Ether, “the extra 10 Ether in the main account came from the mining process”
Conclusion
in this work we have built our private ethereum blockchain which is the first step towards creating an ERC20 token. we’ve explored some tools that make interaction with the blockchain easy and intuitive.
for future efforts, I will look into how to design and deploy smart contracts on our private blockchain using the solidity programming language.